Installing Electronic Water Descaler
Difference Between Unvented and Vented Plumbing Systems
Establish if your plumbing system is unvented or vented.
Unvented systems have no header tanks and water is heated at mains pressure.
Vented plumbing systems have a cold water storage tank normally in the loft and generally above the airing cupboard.
Installation of Water Descaler on Unvented Systems
For Unvented Systems it doesn’t matter where you install your Electronic Water Descaler as long as it is done on the Cold mains pipe.
This is because the Little Plumber Water Descaler puts a current in the water it travels up-stream and down-stream to the remotest parts of the cold plumbing system. Therefore you can install it anywhere as the direction of the water flow is not relevant.
Installation of Water Descaler on Vented Systems
The Electronic Water Descaler only works if there is no break in the stream. With a cold water tank in the loft the water fills up through a ball valve so there is a break in the stream and the current injected by the Water Descaler cannot jump this gap.
Ultimately this means the water in the tank becomes untreated. Therefore you will need to install 2 Electronic Water Descalers in the house.
1: Anywhere on your cold mains
2: On the cold down service to your hot water cylinder.
This is important because if you don’t treat treat the water in the cold down pipe to the hot water cylinder then it will continue to fur up and the immersion element will breakdown from being covered in limescale.
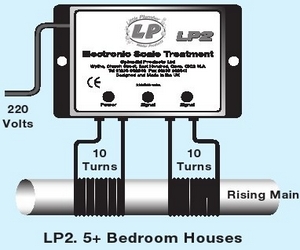
For larger homes (five bedrooms plus) fix one LP2 on the mains and one LP1 on the cold down service.
Step by Step Guide for Installing LP1 (1-4 Bedroom Homes)
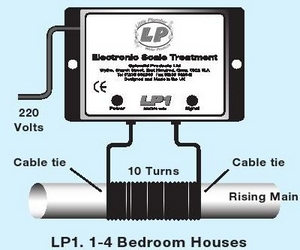
1: Decide where to install ensuring that once the aerial wire is wound around the pipe there is enough spare wire to plug the ends into the sockets on the system.
2: You need at least 10 aerial turns for the best effect. Simply wind the aerial around the pipe being treated and secure both ends with a cable tie.
3: It is recommended to secure the first wind with a cable tie before finishing the rest.
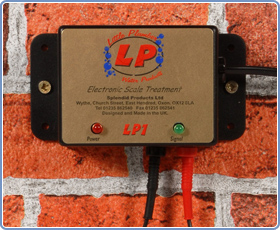
4: The red jack goes into the red plug and the black jack onto the LP1 unit.
5: Attach the Water Descaler Unit to the wall with the screws provided.
6: Plug in and switch on. The red LED should be on constantly. The two green LED lights should be flashing. If they aren’t double check that the aerials have been connected properly.
Guide for Installing LP2 (5 Plus Bedroom Homes) 
The LP2 has two aerials and a stronger output than the LP1. Repeat the above steps except you will have two aerial loops on your rising main.
For more product information, features and benefits, product dimensions, prices and video installation demonstation on go to the Electronic Water Descaler Shop Page