Camcaddy Universial Camera Battery Charger User Guide
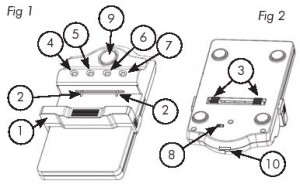
It is very important to correctly locate the battery into CamCaddy before connecting  CamCaddy to a power source (e.g. in car plug, mains plug, PC, Lap top or even a solar charger such as Freeloader or Freeloader Pro). If CamCaddy is connected to a power source without a battery a warning
LED (4, fig 1) will glow RED and Camcaddy should be immediately disconnected from the power supply.
What components come with the CamCaddy Battery Charger?
1 x CamCaddy
1 x Power / USB Cable
1 x UK Mains Plug
1 x European Mains Adaptor
1 x US Mains Adaptor
Using the Univerisal Camera Battery Charger
a. Slide the bar (1, fig 1) back beyond the size needed to place the battery into the CamCaddy and rest the battery on the black rubber edge of the bar making sure the batteries terminals are not touching the power pins (2, fig 1).
b. Align the two power pins by using the sliders (3, fig 2) on the rear of CamCaddy – adjust the distance between them so they align with the positive and negative terminals of the battery you wish to charge.
c. Gently allow the bar to rise ensuring the power pins only make contact with the batteries positive and negative terminals (these will always be marked on the battery).
d. If LED 7 (fig 1) is glowing RED it indicates that the positive and negative terminals on the battery are the wrong way around for the polarity of the power pins (reverse polarity). Please correct this by moving the switch 8 (fig 2). The LED 7 will now turn off indicating that the correct polarity has been observed.
e. Before connecting CamCaddy to a power source you can test how much power is in the camera battery by pressing central button 9 (fig 1). LED’s 4,5,6,7 may glow GREEN. If the battery is completely flat then none of the LED’s will glow. SEE THE SPECIAL NOTE BELOW.
f. CamCaddy is now ready to connect to a power source. Insert the mini USB end of the power cable into CamCaddy. You can now insert the full size USB end of the power cable directly into a PC or laptop (for charging batteries less than 5v only) or into the car or mains plug as required. CamCaddy has an in built voltage adjuster that will automatically deliver the correct voltage to whatever camera battery is attached.
g. The LED’s – 4,5,6,7 (fig 6) will now glow green according to what stage the battery charging cycle is at (each LED roughly represents a 25% charge). Note – If connecting CamCaddy to a PC or laptop via the USB / power cable, you will only be able to power batteries 5v or less – most typically used in compact digital cameras and mobile phones.
h. CamCaddy will indicate the battery is charged from 76% to 99% when all four LED’s 4,5,6 and 7 (fig 1) are GREEN. When the battery is 100% charged LED 4 will glow RED.
CamCaddy In Car and Mains Plugs
CamCaddy requires a constant voltage of 9.5v input to operate efficiently. Therefore the USB mains plug and in car plug have been modified for the higher voltage.
IN NO CIRCUMSTANCES USE CAMCADDY’S SPECIAL MAINS OR IN CAR PLUG WITH ANY OTHER DEVICE OTHER THAN CAMCADDY AS DAMAGE TO THAT DEVICE WILL RESULT.
Once the charging is complete
a. Disconnect the cable from the power supply.
b. Disconnect the cable from CamCaddy
c. Remove the battery from CamCaddy
Special Note on Universial Camera Battery Charger
If the battery to be charged is completely flat and no LED’s 4, 5, 6 or 7 (fig 1) are glowing when the central button 9 (fig 1) is pressed, it is possible to insert the battery into CamCaddy in a reverse polarity position (see step d) without realising it. In this circumstance you should connect CamCaddy to a power source as previously described. Within 5 minutes you will either see LED 4 glow GREEN which will indicate that you have correct polarity and charging is commencing normally, or no LEDs glowing at all – in which case you should change the position of switch 8 to reverse the polarity and commence charging.
Camcaddy Battery Charger Warning
1. Keep CamCaddy away from fi re, water and any form of moisture to ensure damage and injury do not result.
2. Any severe shock or impact may result in damage and will invalidate the warranty.
3. It is forbidden to dismantle CamCaddy except by Solar Technology personnel or agents appointed by Solar Technology. Any sign of tampering will result in the warranty being invalidated.
Universial Camera Battery Charger Warranty
CamCaddy is supplied with a 12 month warranty. Should a failure occur during this time Solar Technology International Ltd will repair or replace any faulty part/s, at its discretion upon a copy of the proof of purchase being provided. Solar Technology International Ltd does not accept liability for any 3rd party damage how so ever caused or any costs associated with the return of faulty products.To make a warranty claim please telephone Solar Technology International Ltd on+44 (0) 1684 774000 or support@solartechnology.co.uk
Using CamCaddy Tags (included) to charge Blade Style Batteries
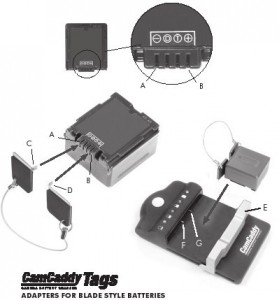
CamCaddy Tags are for use with batteries whose terminals are so narrow as to be  ordinarily uncontactable by CamCaddy power pins (F & G)
a. Identify the positive and negative terminals (A & B) on the underside of the battery – as shown left, they are clearly marked as the two outside ‘slots’ of the four terminals.
b. Position the CamCaddy Tags so that the Terminal Contacts (C & D) are uppermost (as shown), then insert them fully into the positive and negative slots (A & B) on the battery.
c. Turn the assembly upside down so that the battery terminals are on the bottom, pull back the Slider Bar (E) on Camcaddy, and lower into place so that the Tags make contact with CamCaddy’s Power Pins (F & G),taking care to ensure that each Power Pin touches only one Tag. Release the Slider Bar to hold the battery in place for charging.
Buy Camcaddy Universal Camera Battery Charger
Read frequently asked customer question on the Camcaddy