Owl Smart Heating Controls Installation Guide
Please read this before you start
This is a quick start method for the installation of OWL Intuition heating and hot water controls and is intended to be an aide-memoire for professional installers. Please cross-refer to the supplied installation manuals if further detail is required.
For additional help and support please visit www.theowl.zendesk.com
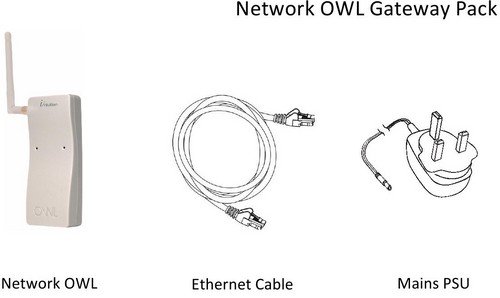
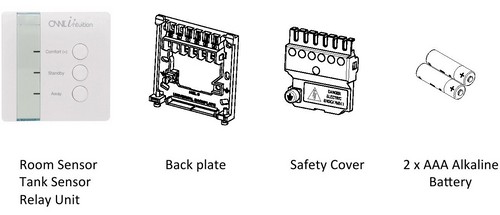
Owl Intuition Smart Heating Hardware Overview
Step 1: Network OWL – Connect to Internet & Power up
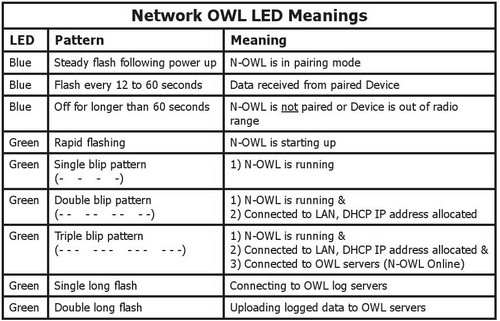
Wait until the green LED is flashing with a “triple blip” pattern.
Do NOT proceed to next step until this flashing pattern is observed.
Step 2: Create Intuition online account & Login
Visit www.owlintuition.com
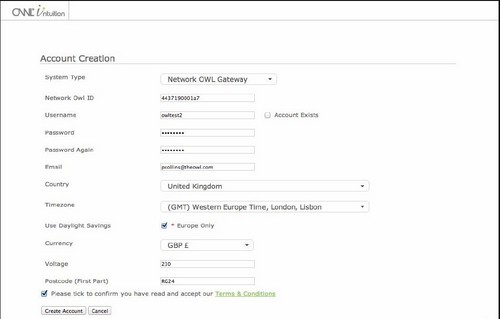
Press Create Account button – set System type as “Network Owl Gateway”
Fill in all information requested
Press Create Account button and ensure Account Creation Complete message is displayed
Log in the Owl Intuition web dashboard
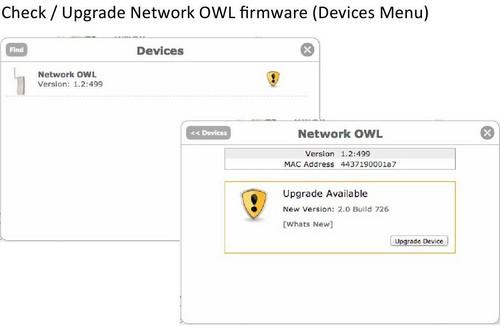
Important – Please upgrade the Network Owl firmware, if required – from devices menu
Step 3: Install Relay Unit (For Cw and Hw Models Only) and Pair to Network Owl
Locate and fix back plate – adjacent to boiler / wiring centre
Install wiring and power up
Remove back-up battery isolating tab
Ensure Relay Unit is in the Network Owl pairing mode (all 3 LEDs flashing)
Pair Relay Unit to Network Owl – press Find button on Devices menu.
(Note in step 6 below you will also need to pair the Relay Unit to the Room/Tank Sensor)
Step 4: Pair Room/Tank Sensor to Network OWL
Put batteries into the Room / Tank Sensor
Ensure Room / Tank Sensor is in Network Owl pairing mode (all 3 LEDs flashing)
Pair Room/ Tank Sensor to Network Owl – press Find button on Devices menu.
Step 5: Pair Room/Tank Sensor to Relay Unit (“wireless” installations Cw and Hw)
Put Room / Tank Sensor into Relay Unit pairing mode by pressing all 3 buttons together for 4 seconds – all 3 LEDs will start flashing
Put Relay Unit into Room / Tank Sensor pairing mode by pressing all 3 buttons together for 4 seconds.
Successful pairing will be indicated when the 3 LEDs on the Room/Tank Sensor stop flashing and the Relay Unit relay can be heard to switch as the Room/Tank Sensor relay switches.
Step 6: Install Room/Tank Sensor
Install and wire the Room/Tank Sensor back plate as required.
Install Tank Sensor external Temperature Sensor probe. (Tank Sensor only)
Fit device to back plate – safety switch must be closed for correct operation.
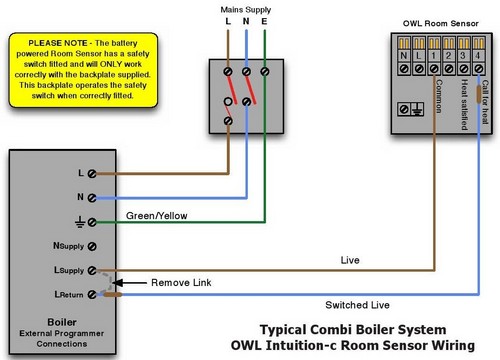
Combi boiler wiring (existing wiring)Wiring Diagram
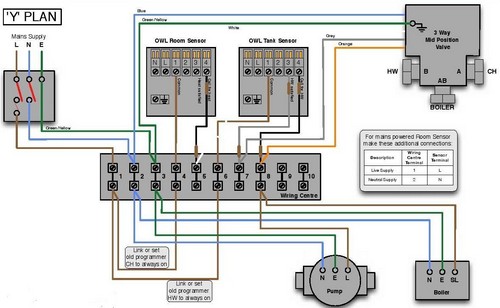
Heating and Hot Water ‘Y’ Plan Wiring Diagram
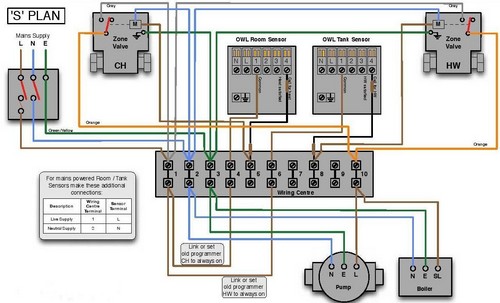
Heating and Hot Water ‘S’ Plan Wiring Diagram
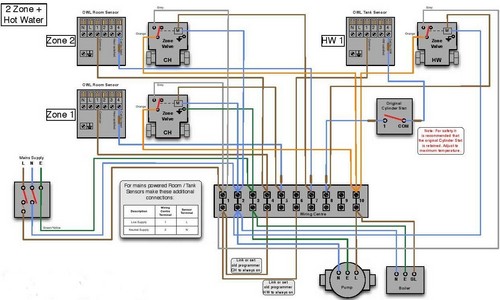
Two Heating Zones and Hot Water ‘S’ Plan Wiring Diagram
Step 7: Repeat from Step 3 for additional system Devices
Please Note:
One Network Owl can support up to 4 Room Sensors with up to 4 associated Relay Units
Additionally it can support up to 4 Tank Sensors with up to 4 associated relay units
One Relay Unit can be paired to multiple Room Sensorts and or Tank Sensors
Step 8: Login, Configure and Test
Log out and back in so that web dashboard picks Heating and/or Hot Water widgets.
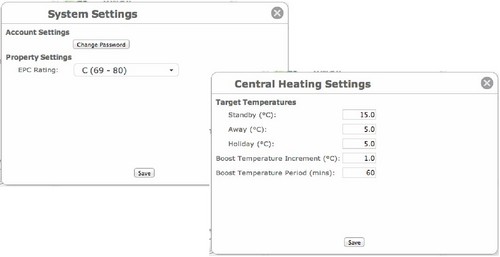
Configure settings – Press “gearwheels icon” on Heating and/or Hot Water Widgets.
Configure time clocks to suit the installation – Press “clock icon” on Heating and / or Hot Water widgets.
Test correction operation of the boiler heating control – “Boost” heating by pressing the Room Sensor “Comfort” button for 5 seconds. Ensure any associated Relay Unit switches and boiler runs. (Note to canel Boost press the Comfort button for 5 seconds again)
Test correct operation of the boiler by hot water control – Press the Tank Sensor “More H/W” button once. Ensure any associated Relay Unit switches and boiler runs. (Note to cancel More H/W press the More H/W button once again)
TIP – See Devices menu / Relay Unit Remore Devces list for paired units. (blue flame icon indicates call for heat from that device) Each device can be give a user friendly name (Upstairs, Downstairs etc)
Step 9: Pre customer handover
Ensure that all steps on this checklist have been followed and that NO problems have been identified.
If there is a problem which you can’t resolve after you have consulted the Installation Manuals then further support can be obtained by
Visiting www.theowl.zendesk.com or phoning the Owl Trade Only Support line on 0044 1256 383435
Please DO NOT leave site without the system being fully operational
Step 10: Customer Handover
Provide the customer with a demonstration of the system in operation and how to login.
Show the customer the Support & Manuals links on the web dashboard
Point out the Heating and Hot Water Controls User Manual on te Manuals screen.
Handover the Heating Control Essentials Card.
Owl Intuition Links to More Information
Order Owl Intuition and more product information
Owl Intuition Product Specifications
Owl Intuition Key Operational Features
Log in here to test Owl Intuition (Username: Owldemo3, Password: demo)
Download Owl Intuition Iphone App
Download Owl Intuition Android App
