Freeloader Pico User Manual
The Freeloader Pico portable device solar charger is an advanced portable power unit designed to charge most electrical devices up to 5V. Freeloader Pico’s internal battery can be powered by a connection to a PC or by its solar panel. Freeloader Pico can deliver power to almost any electrical device using the adaptor tips in this pack (tips for additional devices can be purchased from your local retailer )
We recommend that you charge Freeloader Pico via USB for its first charge. This will enable the internal lithium ion battery to be properly conditioned. To achieve best performance we also recommend that you charge Freeloader Pico from USB once every 3 months.
Freeloader Pico Performance
1. Solar Panel (mono/multi crystalline): 5V 75mA
2. Rechargeable Lithium–ion Battery: 3.7V 800mAh
3. USB input charging: 5V 300mA
4. DC Output: 3V to 5V
5. Time required to deliver power from Freeloader Pico when charging a device: 30 to 45 minutes
6. Time required to charge Freeloader Pico’s internal battery using the master cable connected to a PC or lap top: 3 to 4 hours
7. Time required to charge Freeloader Pico’s internal battery in bright sunny conditions using the solar panels: 10 hours
Note – light quality and time of year play a key role in determining the speed of charge. Cloudy days, the winter and Freeloader Pico being positioned behind a glass window will all dramatically increase the time needed to charge its battery.
Freeloader Pico Included:
1 x Freeloader Pico Solar Charger
1 x Master Cable
1 x Adaptor for Nokia mobile phones
1 x Adaptor for Samsung mobile phones
1 x Adaptor for all Sony Ericsson phones
1 x Mini USB adaptor for Motorola phones, Blackberry and most smartphones, Garmin/Sat Map and most GPS, Bluetooth headsets, PDA’s
Note – The Master Cable is used for both charging Freeloader Pico’s internal battery from a connection to a computer’s USB (using the mini USB adaptor) and also for delivering power from Freeloader Pico to charge a device.
Operation Instructions for Freeloader Pico
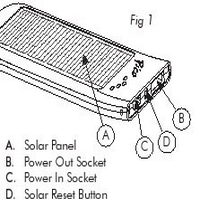
1. To charge Freeloader Pico’s internal battery from a PC Insert the Mini USB  Tip into the end of the Master Cable, then insert the USB plug on the other end of the cable into a PC, laptop or other suitable device (which is switched ON). Insert the mini USB tip into FreeLoader Pico Power In socket (C, fig 1).
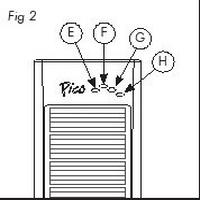
LED E (fig 2) will turn red. Freeloader Pico will be fully charged when the LED E goes out.
Note – Please do not leave the USB charge cable plugged in overnight as damage to the battery may occur.
IMPORTANT – This method of charging is recommended for the first charge from new and may take up to 8 hours.
2. To charge from the solar panel When Freeloader Pico is directed at daylight, LED G (fig 2) will illuminate. Charging will take place immediately and it will take as little as 10 hours in bright sunshine, with Pico positioned outdoors, to fully charge its battery.
Note – Be careful not to scratch the surface of the solar panels and do not clean them with any strong detergent. Due to the ongoing advances in technology we cannot guarantee compatibility with third party devices and in all cases would recommend testing the charger with your device before it is relied upon in the field.
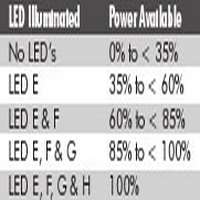
3. Checking how much power is in Freeloader Pico’s internal battery To determine how much power is available in Freeloader Pico simply connect a device to Pico (using the Master Cable and tip or a device’s sync cable). Upon connection, LED’s E, F, G and H will illuminate.
4. To charge a device from Freeloader Pico Insert the USB end of the Master Cable into the Power Out socket (B, fig 1). Select the correct adaptor tip and insert into it the other end of the Master Cable.
Note – if your device is not supported by one of the adaptor tip’s in this pack you can connect the USB sync/charge cable that was originally supplied with your device into Freeloader Pico’s Power Out socket (B, fig 1). Finally insert the tip (from the Master Cable or a sync cable) into the device to be charged.
5. Solar Reset Button If Freeloader Pico’s battery has been fully drained, you can speed up the charging process (if charging by solar) by pressing the Solar Reset Button (D, fig 1) for 3 seconds.
Note – this Button only works if the solar panel is facing daylight when button is pressed.
Freeloader Pico Warning
1. Keep Freeloader Pico from fire, water and any form of moisture to ensure damage and injury do not result.
2. Any severe shock or impact may result in damage and will invalidate the warranty.
3. It is forbidden to dismantle Freeloader Pico except by Solar Technology personnel or agents appointed by Solar Technology. Any sign of tampering wil result in the warranty being invalidated.
Freeloader Pico Warranty
Freeloader Pico is supplied with a 12 month warranty, excluding the battery. Should a failure occur during this time Solar TechnologyInternational Ltd will repair or replace any faulty part/s, at its discretion, upon a copy of the proof of purchase being provided. Solar Technology International Ltd does not accept liability for any 3rd party damage how so ever caused or any costs associated with the return of faulty products.
To make a warranty claim please telephone Solar Technology International Ltd on +44 (0) 1684 774000 or support@solartechnology.co.uk
Replacing Freeloader Pico’s Battery
Freeloader Pico’s battery has a life expectancy of 2 years. Once it has been exhausted please return Freeloader Pico to Solar Technology International Ltd who will replace the battery in its workshop – please see www.solartechnology.co.uk for instructions and costs for this process.
PLEASE NOTE – by removing Freeloader Pico’s battery you will invalidate warranty.
Disposing of Freeloader Pico
If for any reason you need to dispose of Freeloader Pico you will need to remove the battery first. To remove the battery, make sure the battery has no power left in it. Once this is done, open the plastic casing using a sharp edged instrument (care must be taken during this operation and it is not recommended that minors undertake this operation). Once the two halves have been separated, the battery will be clearly visible. Cut the wires using side cutters or similar and remove the battery. Please then dispose of the remaining parts in accordance with your local authority’s instructions. The battery must then be disposed of separately. Please contact your local authority for advice on how to dispose of a lithium–ion battery correctly or return the battery to Solar Technology International Ltd in a plastic bag and padded envelope who will dispose of it in accordance with the correct regulations.

