How to Use the Solar Garden Globe
Choosing the Right Location
The location, weather conditions and seasonal lighting availability will affect the number of hours the LEDs on your Solar Garden Globe are illuminated for. Ideally your solar garden light should receive 8 hours of full sunlight, which will enable your solar garden light to illuminate for up to 8 hours. If your solar garden light is placed in a shaded location the batteries will not charge fully, reducing the hours of night-time illumination and shortening the battery life.
 How to Assemble your Solar Garden Globe
Clip the Glass Globe to the Globe holder.
Simply hold the two metal location clips up and place them into the hole in the globe.
The globe should then hold firmly on to the holder.
Insert the ground spike into the post and push into the ground.
Loosen hard packed ground first otherwise damage may occur to the post or spike.
NOTE – under no circumstances push down on the Globe as both damage to the light and personal injury may occur.
First Time Using Solar Garden Globe
Switch to the on position (the switch is located under the solar panel unit). Depending on how much charge is in the battery depends on how well the light will illuminate on the first day or so. Once the light has been in the sun for a few days optimum operation will be achieved.
Tips on using your Solar Garden Globe
• Do not place your solar garden light near night time light sources such as street lights or floodlights as this may cause the lights to turn off at night.
• To prolong the life of your solar garden light and reduce the risk of corrosion, install away from salty, corrosive or highly fertilised areas.
• Ensure that you do not scratch the surface of the solar panel and ensure that you keep the surface free of dust and debris at all times.
• The LEDs in your solar garden light are not replaceable and should never be tampered with.
• To clean your solar garden light, wipe over using a soft, damp cloth.
 Replacing the Batteries in your Solar Garden Globe
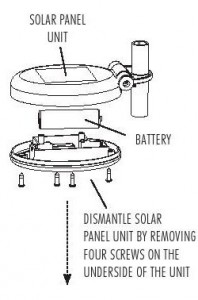
1. Remove the lamp from the ground.
2. Remove the 4 small screws from the underside of the solar panel.
3. Remove the battery and replace with a new rechargeable battery of the same type.
4. Reverse the above procedures and position the lamp back in the garden.