Installing Solar Panel Kits
STEP 1: Fitting the cable to the Solar Panel
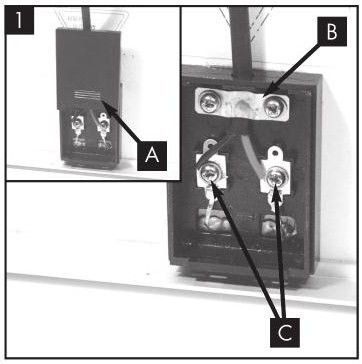
1.1 Remove the cover (A) from the terminal box on the rear of the Solar Panel
1.2 Unscrew and remove the cable clamps (B). Loosen (do not remove) the two terminal screws (C)
1.3 Take one end of the cable and strip back the black outer insulation 4.5cm. Strip back the insulation of the red and black inner cables 1.5cm to expose bare wire
1.4 Feed the the cable through the hole in the terminal box. (The 43 Watt Panel and above have three terminals. Do not use the centre terminal unless connecting one solar panel to another)
1.5 Twist the bare wire ends lightly and wrap clockwise around the loosened terminal screws. Alternatively two ring terminals (supplied) can be crimped onto the bare cable ends
Red (Positive)
Black (Negative)
as marked on inside of terminal box
1.6 Tighten the terminal screws, refit the cable clamp and replace the terminal box cover.
Note: Cable clamp will be give best results with low profile cable if fitted with the bulge facing (touching) the cable.
STEP 2: Fitting the in-line connector to cable (Optional)
This connector is supplied as a convenient means of disconnecting the panel from the battery.
2.1 Decide where in the cable you would like to locate the in-line plug and socket. Cut the cable.
2.2 Strip back the black outer insulation of the cable connected to the solar panel 2cm. Strip back the insulation of the red and black inner cables 0.5cm to expose the wires.
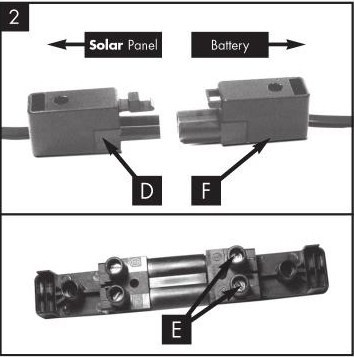
2.3 Remove the cover screw on the male plug (D) and remove the cover. Loosen the two terminal screws (E)
2.4 Twist the bare wire ends tightly and feed through the hole on the plug. Fit each wire end into the correct terminal and tighten the clamp screw:
Red (Positive) = terminal 1 (E)
Black (Negative) = terminal 2 (E)
2.5 Tighten terminal screws and replace cover.
2.6 Repeat procedure for the female socket (F)
STEP 3: Connecting cables to Solar voltage regulator (if required)
3.1 Place the Solar voltage regulator as close as possible to the battery (must be a dry location).
3.2 Measure the distance between your battery terminals and the Solar voltage regulator.
3.3 Cut the measured distance from the end of the cable.
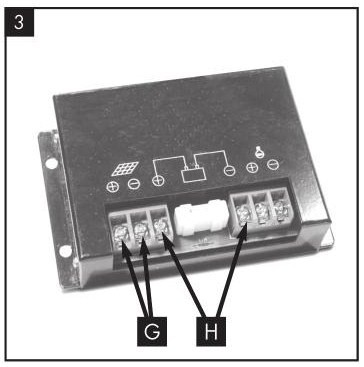
3.4 Prepare as described in 2.2 the end of the cable from the inline connector (if fitted) and attach to the two terminals (G) on the Solar voltage regulator.
3.5 Take one end of the remaining cable, prepare as above and attach to the centre terminals (H)
on the Solar voltage regulator by using the same procedure as described in 1.5.
NOTE:
RED= POSITIVE (+)
BLACK = NEGATIVE (-)
STEP 4: Fitting the fuse
4.1 Strip back the black outer insulation of the cable 20cm.
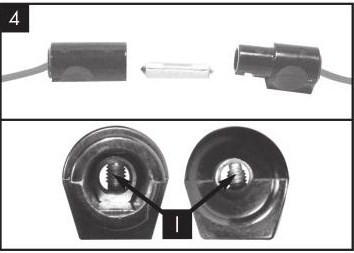
4.2 Cut the red acble at the halfway point and strip 5mm of the red insulation from both the cut ends. Twist the bare wire ends tightly. Fit into the screw
terminals (I) on each of the fuse holder pieces.
STEP 5: Connecting the cable to your battery
5.1 Strip the red and black insulation (3cm) from the inner cable ends. Attach the cable to crocodile clips by following the same procedure as described in 1.5.
WARNING – only attach crocodile clips to a stationary battery.
5.2 Alternatively, for a more permanent connection to the battery, strip red and black insulation (6cm) from the inner cable ends, twist the bare wire and wrap around the battery terminals and fix into position using your battery clamps. Some clamps have connection screws fitted, in which case, if the supplied ring terminals have been crimped onto the wire ends, simply attach using you battery clamp screws.
5.3 When connecting to a battery always observe correct polarity.
IMPORTANT: A Solar voltage regulator (not included) must be used with the 18 Watt , 28 Watt , 43 Watt , 60 Watt ,80 Watt , 120 Watt and 150 WATT Solar Panel Kit
The 5 Watt and 10 Watt Solar Panels have a reverse feed diode fitted in the junction box so they can be connected directly to any battery of 34Ah or 70Ah (respectively) or over without a Solar voltage regulator
Connecting an inverter into the system
Should you require your solar system to power 240v appliances, you will need to connect an inverter. The inverter will be ideally positioned reasonably close to the battery. Most inverters come with pre-fixed cable so fix the loose end directly onto the battery terminals (positive to positive / negative to negative)